
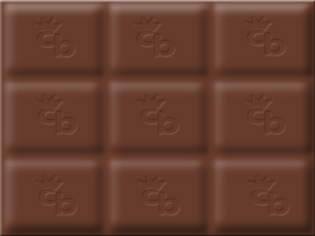
Personally, I don’t like to use bevel effect in my work. I like things to be flat. But, one night I saw the billboard on the street with huge chocolate and it was actually a photograph of chocolate. So, I decided to reproduce it in Photoshop but without using bevel effect it’s almost impossible to do that. Just check it out bevel in action.
1. As a first step create new document in Photoshop with 640x480px in size and with white background. Unlock background layer and fill it with brown color – #764A39.
2. Apply Bevel and Emboss on this layer. Leave all settings as default but only change Size: to 18px and Soften: to 16px.
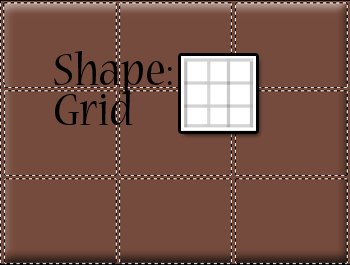
3. Pick your shape tool (it’s under the rectangle tool). Be sure that you have selected “shape layers” and layer style to none in tool menu. Load all shapes that comes with Photoshop and find “Grid” shape. It’s easy to find this shape if you turn off thumbnail view and switch to text only view.
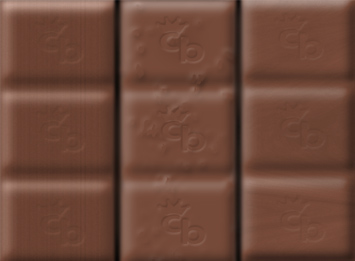
4. Now, you should apply this shape over the background layer. Start from the top left corner and try to cover background layer with this shape. In the next step make selection of your shape so you can see marching ants on the grid. You can do it with Cmd/Ctrl + click on shape layer mask or by making a selection in the paths. If you want more space between rectangles once you have selection go Select – Modify – Border and enter 10px value.
With selection still active select background layer (the one with bevel effect applied) and go Edit-Cut. Delete grid layer.
5. Add new layer below the layer with bevel effect ( Cmd/Ctrl + click on new layer icon at the bottom of layers palette). Fill this layer with brown color – #764A39. Select layer with bevel effect and apply Filter – Gaussian Blur with radius: 5. After this step you should see your chocolate. If you wish you can scale down layer with bevel effect 10px from each edge and then apply bevel effect on layer below with settings: Depth: 1000%, Size: 10px. You don’t need to scale if you already have modified selection border by 10px.
Adjust levels and save the file as .psd because of experiments we are going to perform now.
Embedded text or logo
If you want your logo or few characters on each rectangle of chocolate then flatten these two layers. Apply bevel and Emboss with default settings on this single layer you now have.
You can simply apply type on one rectangle and then clone it to other ones with move tool and Cmd/Ctrl + Option/Alt pressed. Including Shift in this key combination will help you to perfectly align cloned text or logo. It doesn’t matter what color you have for the text or logo. You will get many new layers (copies). Merge type or logo copies into one layer. With layer above the chocolate layer selected make selection of all your text. Now, you guess! Select chocolate layer and go Edit-Cut. Remove type or logo layer. To cover holes you just made add new layer bellow and fill it with brown color. To get rid of extra bevel we have on edges you should try the following:
Drop opacity of chocolate layer or use blur tool.
Flatten these layers in order to see filters in action.
Filters to consider
1. Filter – Distort – Diffuse Glow. This filter with correct settings will make chocolate more flat. It presents another way to get rid of extra bevel.
2. Filter – Texture – Grain. Settings: Intensity: very small, Contrast: 0 and Grain type: horizontal or vertical. Adjust levels after this filter.
Try to do something with patterns above the chocolate layer and with eraser tool on layer with bevel effect. When you finish with this tutorial just go get some real one.
Comments are closed.